Docker learning path with WildFly
EDIT: This post has been edited to reflact the latest changes as described here
Docker, Docker Compose, Docker Machine, Docker Swarm, Kubernetes, OpenShift v3 are some examples of tools and projects that are well consolidate in the container universe of Docker. Things are moving pretty fast and sometimes it’s hard to move from a simple execution of a container ( docker run -it fedora bash ) to a Docker cluster in the cloud.
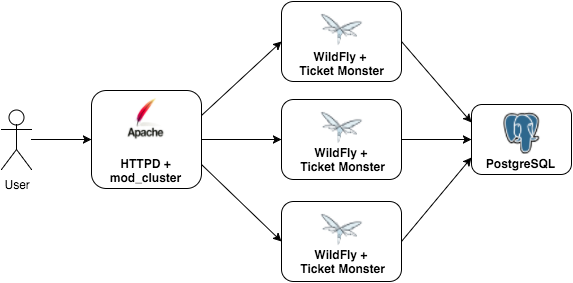
I’ve my own lab environment that consists in a WildFly container with Ticket Monster application connected to a Postgres container. To load balance the application, I use Apache httpd with mod_cluster. The overview diagram of this environment can be seen in the following picture:

This blog post will show a suggested learning path to have this environment to be executed in raw docker engine (CLI), docker-compose, docker swarm and finally using Kubernetes. In all cases, the same Docker images were used:
- Postgres (postgres:latest)
Apache HTTPd + mod_cluster (rafabene/mod_cluster:latest)- Apache HTTPd + mod_cluster (karm/mod_cluster-master-dockerhub:latest)
Wildfly + Ticket Monster (rafabene/wildfly-ticketmonster:latest)- Wildfly + Ticket Monster HA (rafabene/wildfly-ticketmonster-ha:latest)
Note that no changes were required in the prepared image to run in all environments.
The required files and instructions are available in github.com/rafabene/devops-demo
Docker
The first thing that we learn is how to execute docker containers using docker command.
The instructions to run this environment using docker CLI only is available here. I suggest you to execute these instructions before moving on. Basically you will need to execute each one of these containers individually.
Note that the postgres image uses environment variables (POSTGRES_USER and POSTGRES_PASSWORD) to define the username and password of that container.
All containers are execute in a single Docker host (where the daemon is running) but each container has his own internal IP address (which changes each container execution). To be able to make Wildfly image to talk with Postgres, a “container link” is created. When –link is specified, docker updates the /etc/hosts file with the IP address with the linked container. a “docker network” is created. When –net is specified, docker updates the /etc/hosts file with the IP address with the linked container.
To execute more than one WildFly instance, you will have to execute multiple containers manually. Note that WildFly containers doesn’t specify port mappings because we don’t want/need to access WildFly directly.
The cons of this approach is that you need to execute all containers individually with the proper docker params to make the cluster work.
Docker Compose
The docker solution to simplify the execution of multiple containers with the proper params is to use Docker Compose. Docker Compose allows to specify an YAML file that contains the definitions for each container.
Here you can see the content of the YAML file for this environment:
1
2
3
4
5
6
7
8
9
10
11
12
13
14
15
16
17
18
19
20
21
db:
  container_name: "db"
  image: postgres
  net: mynet
  ports:
     - "5432:5432"
  environment:
    - POSTGRES_USER=ticketmonster
    - POSTGRES_PASSWORD=ticketmonster-docker
modcluster:
  container_name: "modcluster"
  net: mynet
  image: karm/mod_cluster-master-dockerhub
  environment:
    - MODCLUSTER_NET=192. 172. 10. 179.
    - MODCLUSTER_PORT=80
  ports:
     - "80:80"
wildfly:
  image: rafabene/wildfly-ticketmonster-ha
  net: mynet
The instructions to run this environment using Docker compose is available here. I suggest you to execute these instructions before moving on.
Note that a single commmand ( docker-compose up -d ) can start the whole cluster with the proper params and links between the containers. It even build the image dynamically.
Scale WildFly is simple as docker-compose scale wildfly=5
The cons of this approach is that we have a physical limit on how many WildFly instances we can run simultaneously. Remeber that every container still being executed in a single Docker host (docker daemon).
Docker Swarm
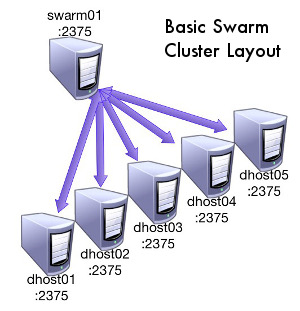
“Docker Swarm is native clustering for Docker. It allows you create and access to a pool of Docker hosts using the full suite of Docker tools.” (https://docs.docker.com/swarm/)
When you have a docker swarm cluster you will see all docker nodes as a single one. The only difference is that your container can be executed on any docker node in the cluster.

Since Docker 1.9, a new container network model was introduced which allows containers in different hosts to be part of a multi-host network..
Docker compose can also be used with few modifications in the YAML file.
To execute this environment in Docker Swarm, follow the instructions available here. Once more, I suggest you to execute these instructions before moving on.
Kubernetes
Kubernetes have a lot of contributions from big companies to have a solution “for automating deployment, scaling, and operations of application containers across clusters of host”.
I still need to prepare a blog post with more details about Kubernetes concepts (nodes, replication controllers, services, labels, pods, etc). Before Swarm and OpenShift v3, Kubernetes was a natural choice for people who are familiar with Docker containers and wanted to run it in a cluster.
The Kubernetes installation is a little bit more tricky with different approachs as you can see here: http://kubernetes.io/gettingstarted/. The most easy way to have Kubernetes running is run:
1
2
export KUBERNETES_PROVIDER=vagrant
curl -sS https://get.k8s.io | bash
If you have a Kubernetes cluster running, you can try the Kubernetes instructions for the same docker environment here.
You can see how powerful is Kubernetes in this video: https://www.youtube.com/watch?v=AAS5Mq9EktI - Ray Tsang (Google) and Arjen Wassink (Quintor) demonstrate at Devoxx Antwerp 2015 what happens when you pull the plug on a Docker cluster running on Raspberry Pi’s.
OpenShift v3
Finally we land in OpenShift v3.
“OpenShift 3 is built around a core of application containers powered by Docker, with orchestration and management provided by Kubernetes, on a foundation of Atomic and Enterprise Linux. OpenShift Origin is the upstream community project that brings it all together along with extensions, to accelerate application development and deployment.” (http://www.openshift.org/)

In the next weeks I’ll be updating the material available at github.com/rafabene/devops-demo to include instructions to OpenShift
Conclusion
This is a suggested learning path focused in a real use case using only containers for loadbalancer, application and database.
Of course some users may want to skip certain tools, but taking a ride to execute the same image in raw Docker CLI, Docker Compose, Docker Swarm + Compose, and Kubernetes will definetely give them the ability to understand the tools that you have available and choose the best for their needs.
If you find any issues in github.com/rafabene/devops-demo, feel free to give any feedback!
Thanks for the reading!


Leave a comment